


An expresso please !

A boat is not like a house: there are several possible power sources and you cannot just press the button of the coffee machine and quietly sip your favourite espresso!
This is therefore a short user guide for visitors on-board. It describes this daily activity, step-by-step with the objective, aside from making a good coffee, of helping you to understand how to obtain 230V electrical current on the boat, via three different channels. For those who do not like coffee fortunately this method is easily transferable and can be used for charging telephones or using a 230V electrical appliance.
An electrical coffee machine therefore generally operates at 230V and consumes about 800-1000 W. Electricity is therefore necessary. It may come from:
- The dock: if the boat is connected to an electrical outlet on the dock which has a power supply. This is the simplest scenario.
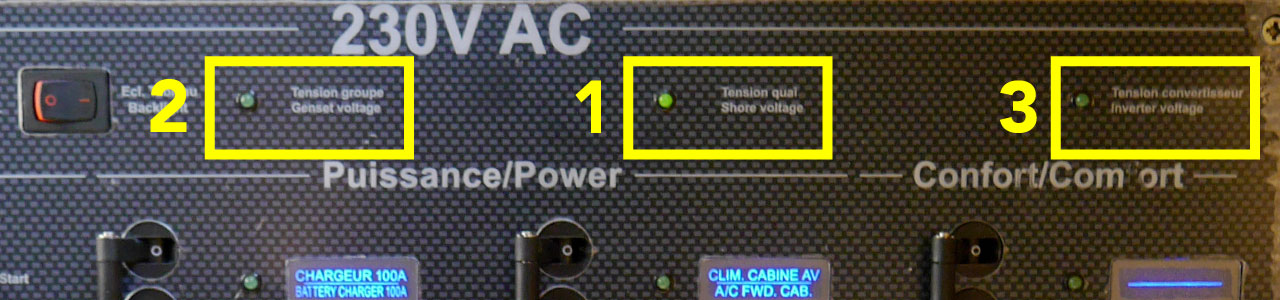
If the green 230V switchboard “dock voltage” indicator light is on, and voltage is displayed on the voltmeter, simply engage the switch of the front electrical socket which is located on the right hand column of the electrical switchboard to power your machine.
If this indicator light is not lit, or if the voltmeter does not indicate any current, this indicates that the boat is not connected to the dock. There are several solutions.
First of all, the electrical outlet on the dock: if there is a time-out, is it necessary to engage the power with a badge supplied by the harbour master? Is there a circuit breaker on the outlet and is it engaged? Is the red indicator light on the extension cord of the dock outlet for the boat lit, indicating that current is passing through the cable?
If everything is fine in this respect on the boat the current can be stopped by 2 circuit breakers. The first one is in the dock electrical box located in the stern cabinet. The circuit breakers are located on the side of the bow which faces the rear of the boat. It must be engaged, i.e. be pointing upwards. The switch present on the starboard side of the same box must not be in the 0 position. It is (generally) on the left, or on the right in the case where the phase will be inverted on the dock.
The last dock switch is on the 230V switchboard itself (on the left at the bottom). Obviously it must be turned for the current to supply the electrical switchboard.
- The electrical generator set: it supplies 230V using diesel and can be used either in the port or when moored. The inconvenience is that it is noisy and it is somewhat of a shame to start an electrical generator set of 11,000 W just to make a coffee. Furthermore, it is better not to start the electrical generator set if you have never done it, as there may be a risk of damage. A more detailed article on starting the electrical generator set is available here.
If you opt for this solution:
- Ensure that the seawater valves are open (main and secondary). They are located in the engine room.

- In passing you can check that the 3 fuses on the unit are engaged, without which the electricity will reach the kitchen 230V switchboard.
- Ensure that no valve is closed on the diesel circuit (one in the alleyway, one on the diesel pre-filters)
- Start the electrical generator set from the 230V switchboard in the kitchen. To do this press the start button for several seconds.
- Wait until the green “GE voltage” indicator light lights up and that the voltage is displayed on the voltmeter.
- Then engage the 230V switches on the 230V switchboard to supply your coffee machine!
However, do not forget to carry out the procedure in the reverse order once your coffee is ready.
- The 2500 W converter (optional): produces 230V from the service battery-set, which is 24V. The advantage is that you can use it at the dock or at sea and it makes no noise. The inconvenience is that it uses battery power, so be careful not to empty the batteries.
To start up:
- Check that the batteries are open (switches under the seat of the map table).
- As a precaution, check the level of the batteries on the voltmeter of the 24V switchboard. They must be above 60%.
- Then turn the 2500W converter button to ON (photo). This button is found either at the map table on the side of the 24V switchboard or above, on the 230V switchboard.
- Once the green “converter voltage” indicator light is illuminated on the 230V switchboard turn on the 230V electrical switches for preparing your precious nectar.
Once your coffee machine is powered on water is required, either to make the coffee itself, or to do the washing up. Once again, the boat is not connected to the mains. The tap water may come from two sources:
- Either the dock
- Or tanks on the boat filled using a fresh-water pump.
- Or again, cheat by using a bottle of water
If the boat is at the dock and that the outlet is operational simply connect the boat to the dock to supply your fresh water circuit. Here there will be the added benefit of the dock water pressure. The connector is found outside at the rear of the boat, next to the exterior shower. Be careful as there are two connectors, an inlet and an outlet. The correct one is the starboard one (on the right facing the front of the boat). Nevertheless remember to cut off the water inlet when you leave the boat as you risk filling it if the connection breaks.
The second source of fresh water is the boat’s water pump. This sends water under pressure from the tanks into the fresh water circuit. To start the pump:
- turn on the batteries and check their level
- ensure that there is water in the tank (gauge on the 24V switchboard)
- start the fresh water pump to the 24V switchboard
- draw water from the tap
Making a coffee on a boat is therefore not as simple as one might think! It requires the use of two of the boat’s vital functions, which are water and electricity, and requires having several indications on-board. Fortunately, these indications are also more generally useful for life on-board and can easily be transferred to other daily activities.